Upgrade your PC storage in the Eniun PC Lab 3D simulator. Install a 3.5-inch SATA hard drive, a 2.5-inch SATA SSD and an M.2 NVMe 2280 SSD. The drive from the motherboard assembly practice stays in M.2_2.
Components in this lab
- 2 TB 3.5-inch SATA hard drive. High-capacity mechanical storage for photos, videos and backups.
- 2 TB 2.5-inch SATA SSD. Solid-state storage with no moving parts.
- Two SATA data cables. They come with the ASUS PRIME B760-PLUS D4 motherboard.
Safety and preparation
- Shut down the computer, turn off the power supply using its rear switch (the “O” position) and unplug the power cord.
- Wear a grounded antistatic wrist strap, as in the previous labs.
- Each SATA drive needs its own data port. The M.2 SSD plugs directly into the motherboard.
- Keep the motherboard manual nearby: it identifies the available slots and connectors.
SATA and M.2
The M.2 NVMe SSD plugs into the motherboard and draws power from its slot. The 3.5-inch hard drive and 2.5-inch SATA SSD each need two cables: one for data to the motherboard and one for power from the power supply.
The motherboard has four 6 Gb/s SATA ports. That is the link speed limit. A SATA SSD is typically faster than a hard drive and slower than an M.2 NVMe SSD.
A hard drive, a SATA SSD and an M.2 SSD can coexist in one PC. In this practice you install all three to learn the different mounting methods. In a real PC, install the drives you need.
SATA connectors
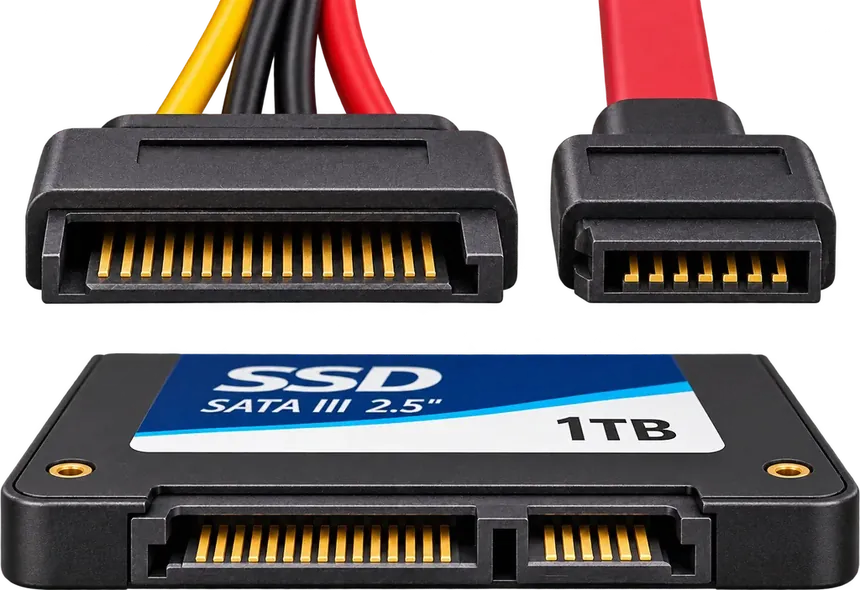 Top: the 15-contact power and 7-contact data plugs. Bottom: with the SSD label facing up, power is on the left and data is on the right.
Connector end of a 3.5-inch hard drive, with the cover on top, shown to scale (101.6 × 20.2 mm). The two L-shaped keys sit at the outer ends and fit in only one orientation.
- Data: a narrow 7-contact connector. Either end of the cable can go to the drive or motherboard.
- Power: a wide 15-contact connector from the power supply. A single cable can have several connectors to power multiple drives.
- Both connectors are L-shaped and fit in only one orientation. If a connector does not fit, check its orientation and avoid forcing it.
- The large 4-pin peripheral connector (Molex) also comes from the power supply. This power supply has five SATA connectors and two peripheral connectors.
Handling a hard drive
- A hard drive is a delicate mechanical component. Hold it by its edges and avoid pressing on the cover.
- Avoid touching the contacts or the circuit board underneath. Leave the labels in place.
- Keep it on a cushioned, antistatic surface until installation.
- Fasten it with four 6-32 UNC screws in the side or bottom holes. Avoid overtightening.
M.2 SSD: data and power through the slot
Install an NVMe 2280 SSD in the free M.2_3 slot, next to M.2_2 where the drive from the motherboard assembly practice is fitted. The slot provides data and power. Insert the SSD and secure its end at the 2280 mounting point. M.2 drives can use different interfaces. This one uses PCIe NVMe.
Lab sequence
Open the case and install the hard drive and SATA SSD. Fasten them and connect their data and power cables. Then insert and fasten the M.2 SSD and close the case.
Each SATA drive needs its own data port. The M.2 SSD plugs directly into the motherboard.
After assembly, check that the computer detects the drives. If a new drive is empty, set it up in the operating system. If a drive does not appear, check both cables on the SATA drive or check that the M.2 SSD is seated.
The components are generic. Their connectors, dimensions and assembly sequence follow manuals for equivalent components and the motherboard. The 3D representation is an educational approximation.
Assessments
Test: upgrading PC storage
Your progress is saved only in this browser and is not sent to any server. Privacy and cookies